Free patchwork Quilted Tote Bag Tutorial: Fat Quarter Friendly

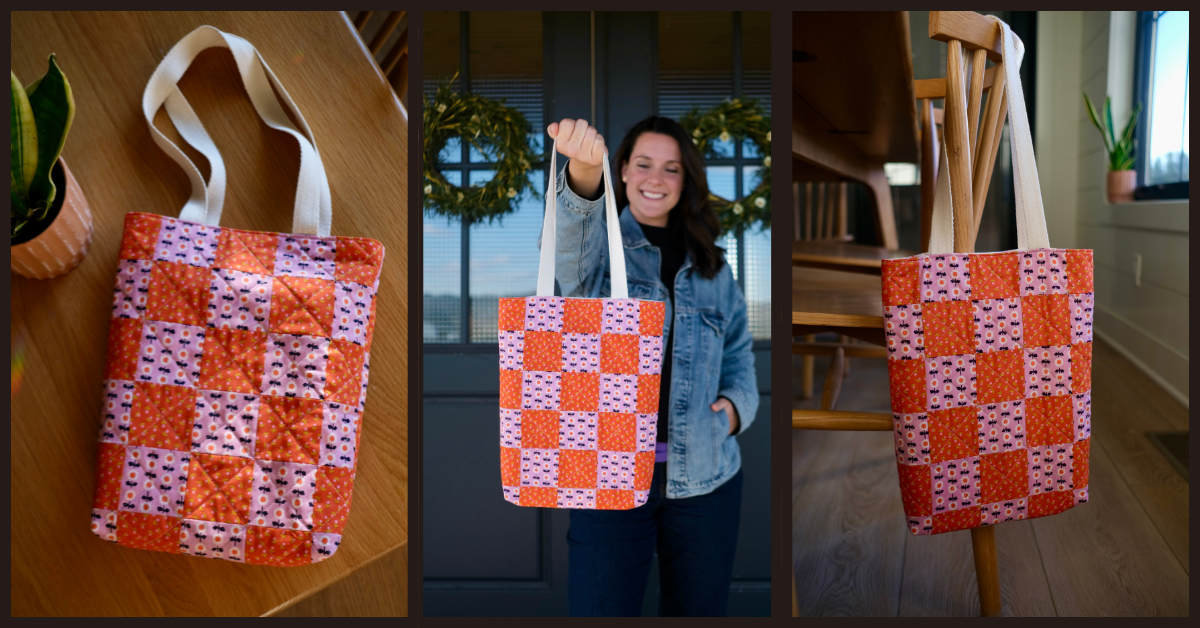
I am so excited to show you how to make this cute, patchwork tote bag! I find myself using tote bags all the time, and this one is such a great size and since it’s quilted it gives some padding and protection to the items inside.

Make this tote bag for yourself, your friends, your family, anyone who needs a tote bag… which is everyone really. This size and design of tote bag is so useful and makes a really great gift!

A person holding a colorful patchwork tote bag made from pink and orange fabrics, standing outside a home.

Patchwork tote bag supplies:

  • Outer Fabric: (2) Fat Quarters of fabric or (2) pieces of fabric (quilting cotton) measuring at least 15″ x 18″ (My Fat Quarters that I used for this bag are by Ruby Star Society from Pear Tree Market.)
  • Lining Fabric: (2) pieces of fabric (quilting cotton) measuring at least 13″ x 16″ (you can cut these pieces from (1) 1/2 yard pieces of fabric that has a width of fabric of 42″)
  • Backing Fabric: *optional* (2) pieces of white or neutral fabric (quilting cotton) measuring at least 15″ x 17″ to use as the backing when quilting the front and back panels of patchwork. (I like to use backing because it gives the bag more shape and I personally find it easier to quilt but you can always skip this and quilt the panels using only the patchwork panel and batting.)
  • Batting: (2) pieces of batting measuring at least 15″ x 17″ to be used when quilting the patchwork panels (I like to use 100% cotton)
  • Straps: 1″ Heavy Cotton Webbing at least 48″ long (I just keep a roll of this webbing on hand for making bags!) Cut into (2) 24″ pieces.

Basic Sewing Supplies needed:

Quilting Terms:

  • RST = Right Sides Together (right side of the fabric refers to the side that is to be seen when the project is complete)
  • Fat Quarter: a pre-cut size of fabric that is approximately 18″ x 22″ in size

STEPS:

  1. Cut each of your (2) Fat Quarters of fabric into (5) 3″ x 18″ strips. I start by cutting off the selvage (aka: finished edge of the fabric) and then cutting 3″ strips from there. If the strips are slightly longer than 18″, that is okay. (Photo below is one of my fat quarters cut into (5) 3″ x 18″ pieces)
Fabric strips cut for a patchwork tote bag, featuring a floral pink pattern, arranged in rows on a black cutting mat.

2. Lay out the strips alternating one strip from one fabric, the other strip from the other fabric, 5 strips total for each of the two side panel units. This is the start of each side of your bag.

Cut fabric strips arranged in alternating red and pink patterns for a patchwork tote bag project.
Side 1
Three strips of colorful fabric laid out for a patchwork tote bag, with alternating designs of orange flower patterns and purple floral patterns.
Side 2

3. Sew these strips together using a 1/4″ seam allowance. Press each seam toward the darker fabric. (You will notice that my strips are uneven on one side. FQ can be slightly different sizes. As long as you keep fabric lined up on one side, it will not matter that the other side is uneven.)

Cut fabric strips arranged in a patchwork pattern, featuring alternating prints in shades of red and pink.
Side 1
A patchwork of two different fabrics, showing sewn strips arranged vertically. The fabric features floral designs in a muted color palette, with seams visible along the edges.
Close-up of cut fabric pieces in a patchwork design, featuring alternating patterns in pink and white with small floral motifs.
A patchwork of colorful fabric strips sewn together to create the front panel of a tote bag.
Side 2

3. Cut (6) 3″ strips from each side.

A cutting mat with a ruler placed over colorful strips of fabric in pink, orange, and purple patterns, showing the cutting process for a patchwork project.
Cut fabric strips arranged in a patchwork design featuring orange and pink colors with floral and insect patterns.
Colorful patchwork fabric strips arranged in a grid pattern, featuring orange, pink, and floral designs, laid out on a black surface.

4. Alternate strips from each of the sides to create a pattern.

A patchwork of vibrant fabrics in orange and pink patterns, arranged in a grid layout, ideal for a quilting project or tote bag.
This is 1 of 2 sides.

5. Sew strips together using a 1/4″ seam allowance. Be sure to “nest” the seams of the strips as you sew to keep the pieces aligned. Press seams open.

Close-up of a hand holding two pieces of fabric, showing the seam allowance of a patchwork project.
Nesting the seams
Close-up of a patchwork fabric arrangement with alternating floral and patterned squares, alongside an iron on a pressing surface.
Two joined panels of patchwork fabric in an alternating pattern of orange and pink squares with floral designs.

6. You are now ready to quilt your sides! Make a “quilt sandwich” by placing each of patchwork sides on top of a piece of batting. I also placed mine on top of a white “backing” fabric, but the backing fabric is optional.

A patchwork fabric layout featuring red and pink squares with floral patterns, layered over batting and a backing fabric, prepared for quilting.
One of two sides.

7. Baste and quilt each side as desired. I like to pin baste, and using a Kwik clip saves my fingers! On this tote, I quilted lines that ran from corner to corner on each square. Be sure to use your walking foot on your sewing machine for this step.

Close-up of a patchwork fabric layout for a tote bag, featuring pink and orange floral and patterned squares, with safety pins holding the pieces together on a layer of batting.
A close-up view of a Kwik Clip quilting tool held in a hand, with a patchwork fabric background featuring colorful prints.
Two quilted patchwork panels for a tote bag featuring a pattern of pink and red fabrics, layered with batting and backing fabric.

8. Using a ruler and rotary cutter, trim the batting (and backing) around the quilted fabric.

A crafting setup showing a pink rotary cutter on a patchwork fabric with a ruler and cutting mat, highlighting the quilting process.
Two patchwork fabric panels featuring a checkerboard design with red and pink squares and floral patterns, laid out on a black surface.

9. Your quilted sides should measure approximately 13″ x 16″ but slight variations in seam allowance can cause them to be slightly smaller or larger. At this time, trim your lining fabric pieces to be the exact same size as the quilted sides. I laid my quilted sides on top of my lining fabric and used my ruler and rotary cutter to trim the lining.

Two pieces of fabric with a white background and small floral patterns in shades of pink and orange, laid flat.
Two pieces of lining fabric.

10. Sew outer sides together. Place the sides RST and pin or clip around the exterior on the 2 longest sides and one shorter side. The un-pinned/clipped side will be the top of the bag.

Quilted patchwork fabric panel being held with clips, featuring a diamond pattern.

11. Sew around the pinned/clipped sides using a 1/2″ seam allowance. Be sure to backstitch at the beginning and end.

Close-up of a sewing machine with a quilted fabric being stitched together, featuring pink fabric clips on the edges.
Close-up of a quilted fabric piece with a diamond pattern and a folded edge, placed on a dark surface.

12. Press seam open.

Close-up of a hand positioning a colorful fabric strip onto a quilted beige fabric, showing the sewing process for a tote bag.
You may have to really work at the seam to get it open. I hold it open and then press with my iron.
An iron being used on a quilted fabric, with a focus on the seam being pressed.

13. Fold the two bottom corners so that the side and bottom seams line up. Pin and clip in place.

A hand holding a patchwork tote bag with quilted fabric and colorful fabric strips sewn together.
Close-up of a quilted tote bag showing the fabric strips pinned together with a yellow flower-shaped pin.
I stick a pin all the way through to make sure the seams are lined up.
Close-up of quilted fabric with colorful fabric strips pinned and clipped for sewing.

14. On each of the two corners, use a ruler to mark a line from one fold to the other that measures 2 1/2″ long.

A close-up view of a sewing project showing a trimmed patchwork strip and a quilting ruler on a cutting mat with clips holding the fabric in place.
Close-up of quilted fabric with colorful fabric strips and clips holding them in place.

15. Sew on that line on each of the two corners. (Be sure that you are still using your walking foot to sew these layers together!)

Close-up of a quilted patchwork tote bag corner with fabric strips sewn together, featuring a pink and orange color scheme.

16. Cut the corner 1/4″ away from the seam/line.

Close-up of a quilted patchwork tote bag's corner, featuring colorful fabric strips and a trimmed corner seam.

17. Flip the bag right side out. This is how it should look so far. It’s coming together!

A person holding a colorful patchwork tote bag featuring a mix of pink and orange fabrics with floral patterns.
Close-up of a colorful patchwork tote bag with floral patterns, showcasing the quilted texture and vibrant colors.
You may want to press the bottom corners.

18. Time to sew the lining! Place your lining pieces RST. Mark two lines 6″ apart on the bottom side of one of the pieces. Pin lining pieces together on the longer sides and bottom corners.

Close-up of a hand holding a ruler on a patterned fabric while marking with a blue pen.
Fabric pinned and prepared for sewing, featuring a floral pattern with a blue marking pen nearby.
Pinned quilt fabric with a floral pattern and a marking pen on a dark surface.

19. Sew using a 1/2″ seam allowance along each of the longer sides and bottom corners stopping at the mark you made on the bottom side. The opening you leave at the bottom is very important! This is the opening you will use to turn your bag right side out after sewing it all together.

Press seams open.

Close-up of a partially sewn patchwork tote bag, featuring a white fabric with small pink and orange flowers on a gray surface.

20. Next we will fold, pin, and sew the corners of the lining just like we did on the outer part of the bag. Fold each of the two sewn corners together and match the seams. Pin or clip in place.

Close-up of two fabric pieces being stitched together for a patchwork tote bag, with floral prints and a yellow sewing pin visible.

21. On each of the two corners, mark a line on the corner from fold to fold that is 2 1/2″ long.

Close-up of fabric pieces pinned together and marked for sewing, with a ruler showing measurements.
Close-up of pinned fabric pieces for a tote bag, featuring floral patterns and visible stitching details.

22. Sew on the line. Be sure to back stitch at the beginning and the end.

Close-up view of a sewing machine's needle and presser foot positioned over fabric pieces with floral patterns, featuring pins and a blue fabric clip for alignment.

23. Cut the corner 1/4′ inch away from the seam. Your lining should look like this:

A close-up view of a hand holding a partially finished tote bag lining with floral fabric in shades of pink and orange.

24. Place the straps: Take one of the 24″ pieces of 1″ cotton webbing and place the ends where you would like the straps to be on the outer bag. Clip in place. Repeat on the other side.

A quilted patchwork tote bag featuring bright red and pink floral patterns with white straps.
A close-up image of a colorful quilted patchwork tote bag with a beige cotton webbing strap being attached. The inner lining is visible and held in place with clips.

25. Slip the outer bag inside of the lining. Make sure that these pieces are RST. You will only see the “wrong” side of the lining. Clip the top raw edges together. Start at the seams by lining them up and clipping them, as shown below. I use lots of clips all the way around to keep these pieces in place!

A handmade patchwork tote bag is shown, featuring colorful quilted fabric in a vibrant pattern. The bag has two straps attached and is partially inverted, revealing its lining.
Close-up view of the interior seams of a patchwork tote bag, showing the fabric layers and clips used to hold them in place.
lining up the side seams of the outer bag and lining.
A close-up image of a patchwork tote bag with floral fabric, showing fabric layers being held together with colorful clips. The inside of the bag is visible, along with quilted lining.
A close-up of the interior of a quilted tote bag being sewn, showcasing colorful clips securing the fabric layers together.

26. Sew around the top edge using a 1/2″ seam allowance. Back stitch at the beginning and end. I also back stitch on the handles to make the seam even stronger where weight will be carried. (Take your time! You are sewing a lot of layers together. My walking foot is still on and I took off the larger tray on my sewing machine so that the bag could slip around the machine.)

A sewing machine with pinned fabric in the process of being stitched, featuring a floral print and colorful clips.
Close-up of the interior of a partially sewn patchwork tote bag, showing a hand reaching to adjust the lining fabric and quilted batting material.

27. Turn the bag right side out: (My favorite step!) Pull the outer part of the bag through the bottom opening in the lining.

Close-up of a hand pulling a quilted patchwork tote bag lining through the outer fabric, showing colorful floral designs.
A person holding a partially finished patchwork tote bag, revealing colorful quilted fabric and a light-colored lining.
A completed patchwork tote bag with a quilted design featuring alternating colors and patterns, and sturdy fabric straps.

28. You will now need to close the hole that you left in the opening. I like to hand stitch this closed on the fold that was made when pressing the lining seams open.

A close-up of a patchwork tote bag showing floral fabric with pink and orange flowers, highlighting the stitched opening and cotton webbing strap.
A close-up image of a hand holding a sewing needle and thread, stitching a floral patterned piece of fabric.

29. Push the lining into the bag. Press the top seam.

A close-up of a patchwork tote bag with vibrant orange and pink fabrics, being ironed with a steam iron. The bag features quilted patterns and fabric straps.

30. Sew around the top as close to the edge as you can get, about 1/8″ seam allowance.

Close-up of a sewing machine stitching a patchwork tote bag with a colorful floral design and quilted texture.

YOU DID IT! You now have a beautiful, patchwork tote bag! I hope you enjoyed this tutorial. I would love to see your bag! Tag me on Instagram @inthelightquilts

A person holding a colorful patchwork tote bag with orange and pink squares in front of a door decorated with greenery.

Comments

Leave a Reply

Discover more from In the Light Quilts - Blog

Subscribe now to keep reading and get access to the full archive.

Continue reading